
Tutorials
 Prepare Radiant & Hotkeys
Preferences
After you have Installed and started GtkRadiant, you can customize the Preferences (press "P") to suit your needs.

| Game settings: | Here you choose the game you want to map for. |
| 2D Display/Rendering: | Here you should leave the factory settings. |
| 3D View: | This is concerning the 3D window. It's better to push the regulators to the very left. |
| Texture Settings: | Leave the standard settings |
| Layout: | Here you can customize the layout of the windows; You should experiment with this setting to see what you like best, I prefer this layout:
 |
| Mouse: | Here you should make sure that "3 button" is selected; but only if you have a 3-button mouse. |
| Editing: | Just leave the standard settings. |
| Startup/Autosave: | "Load last map on open": command Radiant to automatically open the last used map on startup. "Autosave"-function: Here you can set how often you want the map o get autosaved to autosave.map, 5min is usually a good setting. |
| Paths: | You can just leave this empty. |
| Misc: | You should leave the factory settings. |
| BSP Monitoring: | Not important, because Q3map2 is used for compile |
User Interface
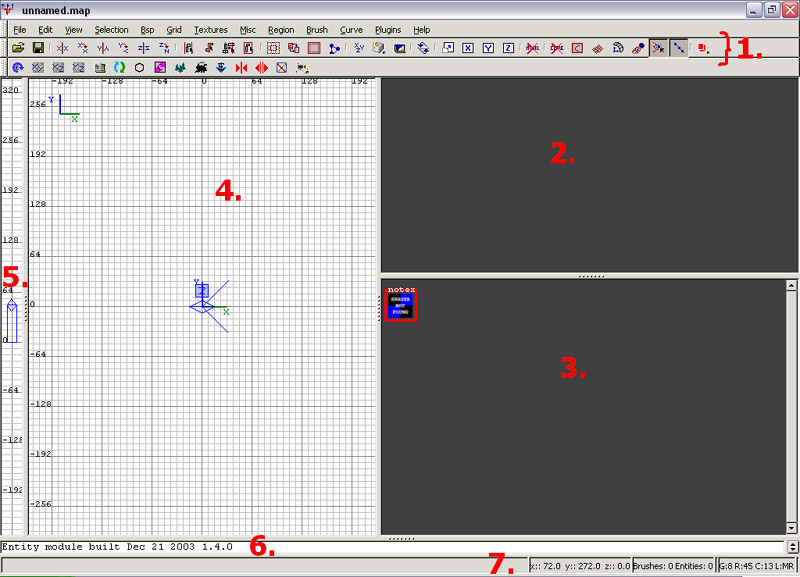
| 1) The menu and toolbars, with which you can do all important stuff. |
| 2) The 3D window, here your map will be displayed in 3D and Color. |
| 3) The Texture window which shows all textures that are currently loaded, to load textures go to: Menu Bar » Textures » *Texture Directory*. |
4) The 2D window, your map can be shown in three ways: from above, from the side or from the front
You can switch between therse views by pressing this button in the toolbar:
 |
| 5) This window displays the height of your brushes; the brushe can be selected and moved up/down (is rarely used » can be hidden). |
| 6) This is a console where the program prints everything its doing including compile logs and actions like moving brushes. This can be limited to 1 row. |
| 7) The statusbar which shows the position (X Y Z coordinates) of the cursor and the number of non-selected brushes and entities. |
Hotkeys
Hotkeys in gereral are used to make Work easier, and whats alot more important, to make it faster. Its not necesarry to know all the hotkeys, because normally all these functions can also be Activated by buttons or menus. There are a lot of hotkeys in GtkRadiant, first, here are the most important ones. (These also apply to many other windows programs):
LMB=left mouse button; MMB=middle ~; RMB=right ~| ctrl + | |
| N | new map |
| O | open map |
| S | save |
| A | select all |
| X | cut out |
| C | copy |
| V | paste |
| Y | undo |
Radiant Hotkeys
| , and . | Move the camera to the left or to the right. |
| A and Y | Tilts the camera up and down. |
| C and D | Moves the camera up and down. |
| E | Selects all sides of the brush so these can be dragged around, this is useful for building angled things. |
| H | This hides all selected brushes (shift + H to show them again). |
| I | Inverts the selection. |
| J | Switches between the four kinds of brush-selection: 1. red overlay + white borders (default and best!) 2. only red overlay (good for editing handmade terrain) 3. no kind of marks 4. only white borders |
| K | Opens the color chooser (for lights). |
| L | Opens the entity overview window where all entity types used are shown. |
| M | Shows how many entities/brushes there are in the map and how often each is used. |
| N | Opens the entity editor. |
| P | Opens the preferences window. |
| Q | Shows the size of the selected brush in all 2D Views |
| R | Activates the Free Rotate function which lets you rotate the brush in any direction (not to recommend due texture disort). |
| S | Opens the surface inspector wich which you can change texture atributes. |
| V | This lets you go into Vertex editing mode. Often used with patches. You will get a wireframe of the selected curve (Patch, Cylinder, Endcap, etc). You can then move the dots to shape the curve. These buttons will help you to rotate bigger selections:  |
| BACKSPACE | This will delete the selection. |
| SPACE | Duplicates the current selection, all properies are kept! |
| 1 - 9 | Changes the gridsize in the 2D windows 1=smallest, 9=biggest, 0=no grid |
Shortcuts
| shift + LMB | Selects/deselects bbjects (only recommended the 3D window). |
| shift + S | Opens the patch properties window, this works similar to the Surface inspector, but is used for patches. |
| shift + P | This turns a normal brush into a patch. |
| shift + U | This activates the cut-out function (CSG Subtract). |
| shift + B | Opens the surface inspector ( = press "S"). |
| shift + R | This makes that the texture is unstickied from the surface, the texture will now stop moving with the surface. |
| shift + T | Undos the above. |
| shift + C | This puts Endcaps on the selected curve. |
| ctrl + LMB | Disorts the selected brush (unimortant). |
| ctrl + K | Connects different entities to eachother (used to make spotlights, connect tiggers to the thing they trigger, etc.). |
| ctrl + I | Inverts the texture on the current curve so that the other side is textured. |
| ctrl + T | Thicken function, just try this out, it will thicken the selected patch. |
| ctrl + 3-9 | Defines the number of corners in a brush. (Dont overuse this, use patches instead!) |
| ctrl + shift + LMB | Selects only one face of the brush. |
| ctrl+shift+alt+LMB | Allows you to select many faces at once. |
3D Window
To move around freely in the 3D window, just rightclick in the window, a white crosshair will appear (see picture).

Now just move the mouse to look around. If you also use the arrow-keys or the scroll wheel, you can look at the map from every angle, and look for errors in the editor. But you can also use the 3D window to do other things:
| MMB | If you have one brush selected, non-selected brush with the MMB the selected brush will get the same texture as the non-selected (very useful and also a lot faster than messing around with the textures window). |
| alt + LMB | Moves the texture on the brush. |
| ctrl + LMB | Disorts the selected brush. |
| LMB | Moves the selected brush around in the map (unaccurate! not to recommend). |

